Preparing photos for your Zen listing

Make your photos listing-ready
Clear photos help people get a feel for your business, services or events. Follow this simple guide to prepare images that look good and load quickly.
Crop → resize → compress → download. Keep your original photos and upload the smaller copies to your Zen listing.
Recommended image sizes
Pixels describe an image’s width and height. KB describes its file size. Aim for around 50–150KB where possible, while keeping your image clear. The maximum is 500KB.
| Image | Recommended size |
|---|---|
| Profile photo | 600 × 600 pixels — square |
| Gallery photos | 1500 × 1000 pixels — 3:2 landscape |
| Business logo | Around 600 pixels wide, keeping its original proportions |
1. Choose and crop your photos
Choose bright, clear photos that showcase your space, ambience or approach. Keep the main subject near the centre, with a little space around it, as images may be automatically cropped in search results and listing previews. Use your phone’s Photos app or your computer’s photo editor to crop your images before resizing them.
- Gallery: choose a 3:2 landscape crop. Keep the main subject comfortably inside the edges.
- Profile: choose a square crop and centre your face, leaving space around it for the circular display.
- Logo: keep the whole logo visible and preserve its original shape.
Cropping removes unwanted edges. Resizing changes the number of pixels. Avoid stretching an image to force it into a different shape.
2. Open your image in Squoosh
Open Squoosh — free image compressor ↗
Squoosh opens in a new tab. Select your cropped image, or drag it into the window. Image processing happens locally on your device.
3. Set the size in Squoosh
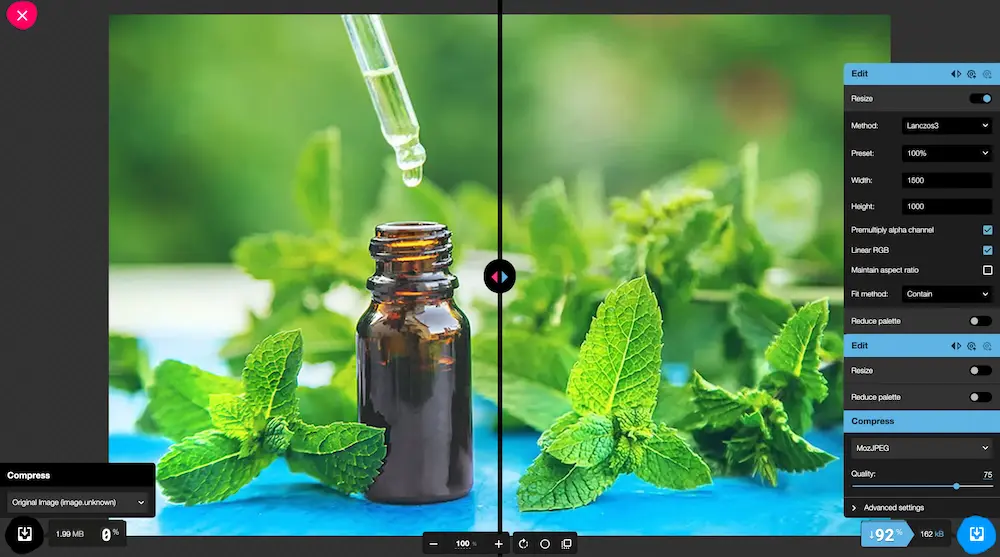
- Switch Resize on.
- Untick Maintain aspect ratio to enter both dimensions.
- Set Fit method to Contain.
- Enter Width 1500 and Height 1000 for gallery photos, or 600 and 600 for a profile photo.
Use Contain rather than Stretch, and check that the whole subject looks right. For a gallery photo that fills the 3:2 frame neatly, crop to 3:2 first. Avoid enlarging a smaller image: this will not add detail.
4. Compress and check the quality
Under Compress, select WebP and start with Quality 75. For a JPG file, choose MozJPEG. Check the new file size shown below the preview.
5. Download and upload the smaller copy
Click the download button on the compressed side. Give the copy a clear name, such as treatment-room.webp, and keep your original safely. Return to your Zen listing and select the downloaded copy. Repeat for each photo.
A note about logos
A transparent PNG or WebP works well for logos. Around 600 × 400 pixels suits a landscape logo; 600 × 600 pixels suits a square one. These are guides, not shapes to force your logo into. Keep text crisp and leave a little space around the design. If compression makes the lettering fuzzy, try lossless WebP or PNG.
Before you upload
- The image is clear and the main subject is not cut off.
- The photo has the right shape and has not been stretched.
- Aim for around 50–150KB where possible, while keeping your image clear. The maximum is 500KB.
- You are uploading the smaller copy, not the original.
- You have permission to use the photo and to show anyone pictured.
Already the right size? You can upload it directly — no need to compress it again.